
Do you know how hard it is to find a glass 9 inch pie plate in London?
Impossible, apparently. I first began my pie journey trying to find said pie plate (or is it pie dish? I'm still learning the pie lingo) when I was reminiscing to my husband about the first 4th of July I remembered when I moved to America as a kid. There was a big lawn with lots of people, and a long white table which was covered in pies. There was going to be a pie contest, but in my head I thought it was a pie eating contest. Six year old me could most definitely win that, Bruce Bogtrotter style. After telling Will about this I just had to make my own, it had been so long since I had had a proper pie.
Now, when you talk about pies in the UK you're usually talking about pork pies, mince pies, kidney pies, steak and ale pies.. But here I'm talking about an American eagle swooping in and holding an all butter pie in its talons while Bruce Springsteen sings in the background. So began my mission of finding all the ingredients and supplies I needed for this perfect pie.
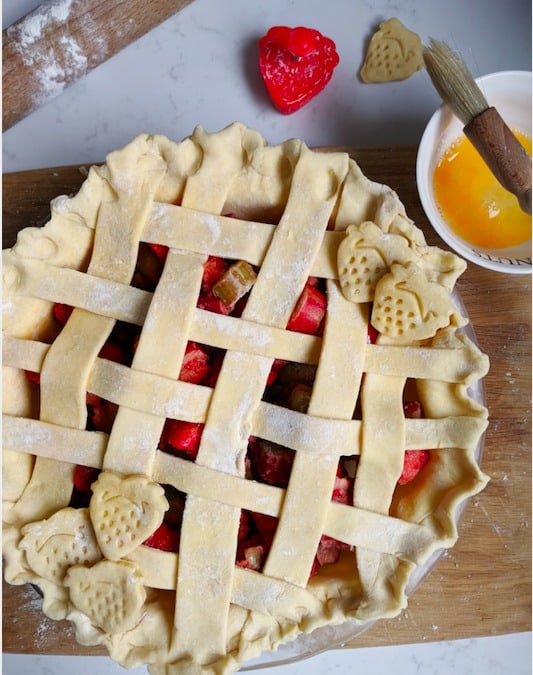
Pie prep!
The thing holding the pie together, metaphorically and literally, is the pie dough. I started researching different recipes for pie doughs, some with apple cider vinegar, others with sour cream, but all with very cold ingredients. When I thought about the last pie I had (pumpkin) all I remember was a soggy bottom that would make Mary Berry recoil in horror. I zeroed in on Erin Jeanne McDowell, I mean the woman is coming out with a book only on pies, and followed her method for a super flaky pie dough. Compared to other methods, she doesn't grate or chop up her butter into small pieces, instead keeps the butter pieces quite large in order to have more of a lamination process.
Next, she recommends using a glass pie plate - that way during the baking process you can check the bottom of the dish to make sure it is cooking all the way through - which is what went wrong when I had made my last pie, many moons ago. I don't want to talk about how much I had to pay in delivery for the glass pie plate I finally found, but it has made a huge difference (change this to something else, bleh).
My local fruit and vegetable box had strawberry and rhubarb available, so I went with that to get a nice mix of tart and sweet. I wasn't sure how long it would take for my precious pie plate to arrive, so I made the mixture as detailed below, then poured it all into a freezer bag. Once I had made the pie dough, I took the frozen fruit mix out and placed it into the prepared pie dish, before chilling it in the fridge for another 10 minutes. Personally I think fresh fruit would be better, but you have to work with what you got!
Pie tips to keep in mind:
- Keep all of your ingredients cold
- Take your time, I did the first part of the dough the night before so it could chill overnight
- Any time you feel like the butter is starting to get too warm or sticky, pop it back into the fridge to firm up
- If all else fails, pie crust cutters make everything better
Recipe
Strawberry & Rhubarb Pie
Equipment
- 9-inch pie dish
Ingredients
- 2 recipes flakey pie dough You can use store-bought but I love making my own!
- 600 grams rhubarb cut into 1 cm pieces
- 450 grams strawberries washed, hulled and quartered
- 1 teaspoon vanilla extract
- ½ cup granulated sugar
- ⅓ cup brown sugar
- 5 tablespoon cornflour
- ½ teaspoon kosher salt if you only have fine sea salt, use half the amount
- 1 egg for egg wash
- 1 tablespoon turbinado sugar
Instructions
- In a medium bowl, add rhubarb, strawberries, vanilla, both sugars, corn flour and salt. Mix well to coat the fruit completely
- Carefully transfer the mixture to a large ziplock bag. Once bag is closed, try to squish the mixture into a circular shape
- Pop mixture into freezer until ready to use
Day of baking
- Heat oven to 220° Celsius
- Once dough is prepared, take mixture out of freezer. Once it's out it will defrost quite quickly
- Pour mixture into prepared pie dish. If mixture didn't end up freezing in circular shape, wait a few minutes to break up the mix so it can fill the dish more evenly
- You can now add your top layer, whether that is a lattice crust like I've done or a full lid. If you are doing a full lid, make sure to slash some holes for steam. Squish the edges of the lattice to the edges of the bottom crust together. Crimp as desired
- Whisk your egg and lightly brush over the dough. Sprinkle over the turbinado sugar. Pop in the fridge to chill for 10-15 minutes.
- Transfer the pie dish to a baking sheet lined with foil (there to catch any juices!). Pop into the oven for 5 minutes, then reduce temperature to 190° Celsius, and bake for a further 75-90 minutes.
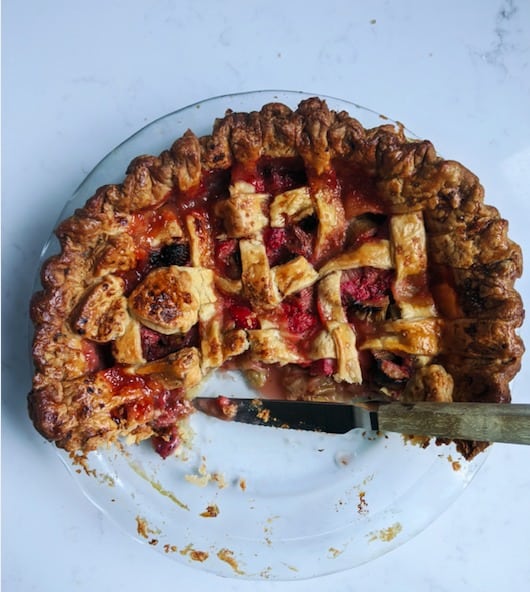
- Once the pie is golden brown and you can see the juices bubbling, it is ready to come out! If using a glass pie dish you can check the bottom to make sure it is cooked through. Let the pie rest for 4 hours now in order for the filling to solidify.
Leave a Reply