Chocolate Peppermint Bark Yule Log
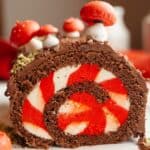
A Peppermint Bark Yule Log with candy cane–striped peppermint buttercream and whipped chocolate ganache. A festive Christmas showstopper!
Servings: 12 slices
Calories: 749kcal
Equipment
- Stand Mixer or Handheld Mixer
- Bowls
- Kitchen Scale
- 12x17-inch Baking Pan I used Nordic Ware half sheet pan
- Parchment Paper
- 2 Piping Bags
- Thin Kitchen Towel
- Rubber Spatula
Ingredients
Chocolate Swiss Roll
- 1 cup All Purpose Flour
- ¼ cup Dutch-Processed Cocoa powder
- ¾ teaspoon Baking powder
- ½ teaspoon Kosher Salt
- 5 large Eggs separated and at room temperature
- ¾ cup Granulated Sugar
- 4 tablespoons Neutral Oil vegetable, sunflower, or canola oil
- 1 teaspoon Vanilla Extract
- Cocoa Powder for dusting the kitchen towel
Peppermint Bark Filling
- 3 sticks Unsalted Butter room temperature
- 1½ teaspoons Vanilla Extract
- ¾ teaspoon Peppermint Extract
- ½ teaspoon Kosher Salt
- 6 cups Confectioners’ Sugar
- ¼ cup Heavy Cream
- Red Gel Food Coloring
Whipped Chocolate Ganache
- ¾ cup Heavy Cream
- 6 oz Semisweet Chocolate finely chopped
- pinch Kosher Salt
Instructions
Chocolate Swiss Roll
- Set your oven to 350°F (175°C). Grease and line a 12x17-inch baking pan with parchment paper. making sure the sides are well greased too.
- In a large bowl, whisk together the flour, baking powder, salt, and cocoa powder.1 cup All Purpose Flour , ¼ cup Dutch-Processed Cocoa powder , ¾ teaspoon Baking powder , ½ teaspoon Kosher Salt
- In a stand mixer fitted with the whisk attachment, or in a large bowl with a handheld mixer, beat the egg whites on medium-high speed until foamy. Slowly pour in ¼ cup of sugar. Beat until you have stiff peaks.5 large Eggs, ¾ cup Granulated Sugar
- Transfer to a separate medium bowl and set aside.
- Using the same mixer bowl (no need to wash it!), beat the remaining ½ cup sugar, egg yolks, vanilla, and oil together until the mixture is thick and pale on medium-high speed. We want this to get to the 'ribbon stage'. Stop the mixer and use a rubber spatula to lift up some of the batter, creating a figure-8 shape with the falling batter. If the batter sinks immediately, you need to continue mixing. If the figure-8 stays for a few seconds, then it's ready!5 large Eggs, ¾ cup Granulated Sugar, 4 tablespoons Neutral Oil, 1 teaspoon Vanilla Extract
- Add half of the egg whites to the yolk mixture with a rubber spatula, gently folding until just combined. Repeat with the second half of the egg whites.
- Fold in half of the dry ingredients until just incorporated, then repeat once more. We don't want to knock too much air out of the cake batter.
- Spread the batter evenly into your prepared pan using an offset spatula. Gently tap the pan on your counter to remove air bubbles.
- Bake for 12–14 minutes, until the cake springs back lightly when touched.
- While baking, place a clean thin tea towel on the counter and dust it with cocoa powder. This will help the cake not stick to the tea towel. You can use parchment paper, but I've found that a kitchen towel works better!Cocoa Powder
- Once baked, carefully flip the hot cake onto the tea towel. Gently peel off the parchment paper (which is now on top).
- Starting from one of the short ends, gently roll the cake up with the towel inside. Roll slowly to avoid cracking the cake. You want to make sure the beginning of the roll is very tight so you get that nice roll effect when you slice into it.
- Let the rolled cake cool completely, seam side down. Feel free to place in the fridge to speed up this process. You can do this 1 day ahead of time!
- If you want to decorate with meringue mushrooms, I recommend doing that while the cake cools.
Peppermint Striped Filling
- Make your filling. In the bowl of a stand mixer with the paddle attachment, or in a large bowl with a hand-held mixer, beat the butter with the confectioners' sugar until light and fluffy.3 sticks Unsalted Butter, 6 cups Confectioners’ Sugar
- Add the peppermint extract, vanilla extract, and salt. Mix once more. I make sure to stop the mixer once in awhile and scrape the sides of the bowl, that way everything is getting well combined!1½ teaspoons Vanilla Extract, ¾ teaspoon Peppermint Extract, ½ teaspoon Kosher Salt
- Pour in the heavy cream and mix once more. At this point your frosting should be smooth and silky. If it's too thick, feel free to add more heavy cream a tablespoon at a time.¼ cup Heavy Cream
- Remove half of the frosting and place in a large piping bag with a round tip, or a snipped off tip.
- Add your red food gel to the remaining frosting and mix to combine. Depending on the brand of food gel, you may need more. I'm using Americolor Super Red.Red Gel Food Coloring
- Place the red frosting in a separate piping bag, also with the edge snipped off or a round tip.
- Once cooled, slowly unroll the cake. Pipe red and white stripes, going from long edge to long edge (see image above for reference). You might have a little bit of frosting left over! Gently roll the cake back up, this time leaving out the kitchen towel.
- Wrap tightly in plastic wrap and refrigerate for at least 1 hour, or up to 2 days.
Chocolate Ganache
- When ready to decorate, make your whipped chocolate ganache. Chop up your chocolate and place it in a large bowl.6 oz Semisweet Chocolate
- Heat the heavy cream in a saucepan over medium-low heat or in the microwave until it is simmering. Make sure it does not boil!¾ cup Heavy Cream
- Pour the hot cream over the chopped chocolate and let sit for 5 minutes.
- Stir the chocolate and cream mixture with a rubber spatula until completely smooth, then stir in the salt.pinch Kosher Salt
- Let it sit at room temperature for 2-3 hours until set. Note, if you just want regular ganache and not whipped ganache, you can pour it over your cake once thickened and skip mixing it with an electric mixer.
- Once the ganache has set and is firm but still soft, use a handheld electric mixer or stand mixer to whisk until light and fluffy.
Assemble & Decorate
- Use a small offset spatula or spoon to cover your chilled and rolled yule log with the whipped ganache. I like to use a fork to create lines that resemble bark! Decorate with meringue mushrooms, a dusting of confectioners' sugar, and some rosemary. Enjoy!
Video
Notes
My recipes have been developed and tested in metric grams. I highly recommend using a weighing scale and measuring out your ingredients the metric way. I have provided a conversion to US cups but please note that I haven't tested the recipe with this method.
Ingredients: I make sure that all of my ingredients are at room temperature before I start the recipe, so pull out all of the ingredients before you start baking.
Salt: If you don't have kosher salt, halve the amount of salt called for in the recipe. 1 teaspoon kosher salt = ½ teaspoon fine salt. Please note, I'm using Diamond Crystal kosher salt and not Morton salt which is too salty!
Meringue Mushrooms: If you want to decorate your yule log like I did, make one batch of meringue mushrooms.
Cocoa Powder: I'm using dutch processed cocoa powder (not sure what you have? Check the ingredients. If it says 'acidity regulator' or mentions 'alkali', then it's dutch processed).
Peppermint Extract: Make sure you're using peppermint extract and not mint extract, which is just going to taste like toothpaste.
Food Gel: My favorite brand of food dye is Americolor! I usually use the shade 'super red'
Make Ahead: If you scroll up, I have a section on which parts you can make ahead and how far ahead of time you can make them.
Nutrition
Calories: 749kcal | Carbohydrates: 90g | Protein: 6g | Fat: 42g | Saturated Fat: 24g | Polyunsaturated Fat: 4g | Monounsaturated Fat: 11g | Trans Fat: 1g | Cholesterol: 162mg | Sodium: 262mg | Potassium: 176mg | Fiber: 2g | Sugar: 77g | Vitamin A: 1117IU | Vitamin C: 0.1mg | Calcium: 60mg | Iron: 2mg
